How do I capture images for use with focus stacking in Visere Captura?
Upgrade to Visere Captura 1.1.36291 or Higher
Please note: There were some issues with focus stacking and older Canon cameras. To properly use Visere Captura, with older Canon cameras, please make sure you follow these steps:
- Make sure you are using Visere Captura 1.1.36291 (October 14, 2024 release) or higher.
- Make sure you enable "Keep live view on after capture." from the Live View options:

- When adjusting the focus stacking positions please make sure that all the adjustments are done in the focus stacking controller and not in the "Control Camera" panel.
Step-by-step guide
This feature lets users capture a series of photos at various focal points, perfect for creating a Focus Stacked image—ideal for macro photography.
- To begin using Focus Stacking Image Capture Mode, enable Live View, then right-click the Snap button and select Focus Stacking from the dropdown menu
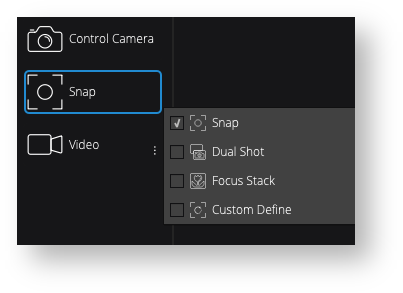
No Right Click on Dual Monitors
If you’re using a dual-monitor setup and don’t see the right-click menu when right-clicking the Snap button, try disabling the second monitor and then right-clicking again. This issue appears to be a limitation of our UI Qt library. We’re actively working on a solution and hope to address it in a future update.
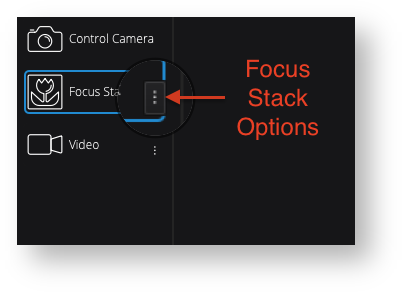
After selecting Focus Stack the icon will change to Focus Stack. Click the 3-dot icon (bottom right corner of focus stacking snap button) to open Focus Stack options. Once you set the focus start or stop point, please DO NOT adjust the focus steps from the Camera Control panel. All focus adjustment steps need to happen inside the Focus Stack plugin.
Adjust all Focus Steps in Focus Stack Plugin
Once you set the focus start or stop point, please DO NOT adjust the focus steps from the Camera Control panel. All focus adjustment steps need to happen inside the Focus Stack plugin.
Users will now need to define their focus stacking preferences. Users can either:
Use the Camera Lens: This will automate lens focal ring movement to define different focal points
Use the Focus Rail System (coming soon)
- Next, user will need to define a Start and an End Point for focus. The Start Point should be at the front of the product while the End Point should be at the back of the product. This will be set while in Live View mode:
- Enable Live View
Open Camera Control Window and the Focus Stacking Options Windows
In the Camera Control Window, enable Live View Zoom at 5X to view up close move the View Finder over the front of the product (Live View 1:1 View location can be adjusted by right clicking on the live view).
Adjust the focal point by clicking the Focal Point Arrows (note, the sensitivity of the focal point adjustments can be adjusted using the numeric entries below the arrows). We suggest using values of 5, 2 and 1 for near and far.
After bringing the front of the product into Focus, select Set Focus Start Point Button:
Adjust Live View viewfinder to position over the back of the object, adjust focal point using the Focal Point Arrows until the back of the object is in focus, then click Set Focus End Point.
Last, define the Number of Frames to be used in the stack (typically between 3 and 5 images should be good however can change based on type of lens being used, distance from lens to object and more variables)
The Focus Stacking parameters are now set. This profile will be used (and retained) anytime the Focus Stacking Snap button is clicked. If the profile needs to be adjusted, simply click the Focus Stacking options and reset.
- More details related to processing focus stacked images are provided in the User Guide in the chapter called Image Composition & Capture Tools.