...
When editing images and throughout Visere Captura, I'm getting confused about the difference of behavior of the buttons: OK, Apply, Reset, and Restore.
| Tip | ||
|---|---|---|
| ||
At the high level, here is a description of each button:
|
Solution
To make Visere Captura an efficient image editor, most imaging filters are automatically previewed as you adjust the filter parameters. For filters that do not automatically preview, such as AIBR, a Preview button is provided for you to click and view the filter results.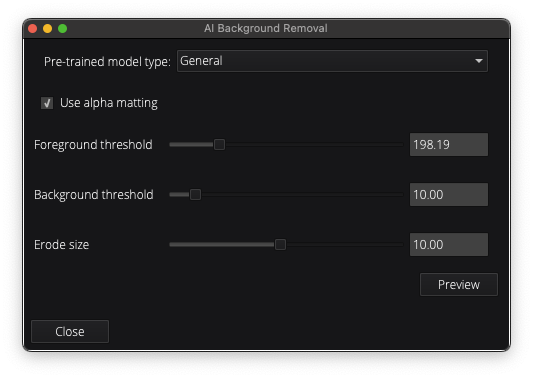
...
Background Removal Tools (Left SideTop)
These tools are the available background removal (BR) tools, listed from top to bottom:
...
- Focus Stacking. Used to take images taken at different focus lengths to create one sharp image.
- Watermark. This is used to generate a watermarking filter, which can be added at the output time, or at editing time.
- View Alignment. This tools is used to see the locus of multiple, same size, images to better understand how well a 360 is centered.
- Add Canvas. Add left, right, top, and bottom canvas.
- Rotate. Rotate the image.
- Resize. Resize the image.
- Transform. Allows you to shift the image from left to right, top to bottom, for alignment purposes, when trying to center a 360.
- Crop. Crops an image.
Basic Color Adjustment Tools (Right Bottom)
These tools contain the basic color adjust options and they are previewed sequentially:
- Select Levels or Curves. These are two standard methods for manipulating the histogram.
- Sharpness. Applies an unsharp masking.
- Brightness. Applies a histogram adjustment.
- Contrast. Histogram adjustment.
- Hue and Saturation.
- Temperature adjustment based on pixel selection.
- Tint adjustment.
Related articles
| Content by Label | ||||||||||||||||||
|---|---|---|---|---|---|---|---|---|---|---|---|---|---|---|---|---|---|---|
|
...
| Page properties | ||
|---|---|---|
| ||
|